The CUTE Eclipse plug-in integrates the CUTE C++ unit testing framework into the Eclipse CDT C/C++ integrated development environment. This plug-in provides all the important features that Java developers know from the JUnit plug-in:
This page shows how to use the CUTE Eclipse plug-in once it is installed.
Select File > New > C++ Project. In the C++ Project dialog, the CUTE Eclipse plug-in provides two new C++ project wizards in addition to those that come with CDT by default:

Select the type of CUTE project you want:
Specify the Project name and click Next >. On the following wizard page, you can choose which CUTE headers to use (recommended are the newest ones) and if you want to use Gcov and/or CUTE’s boost-headers (if one of these optional CUTE features was installed). If you specify an existing Eclipse project you want to test, CUTE creates a unit test for that project. Upon clicking Finish, the wizard creates a project containing all the CUTE unit test framework’s source files.
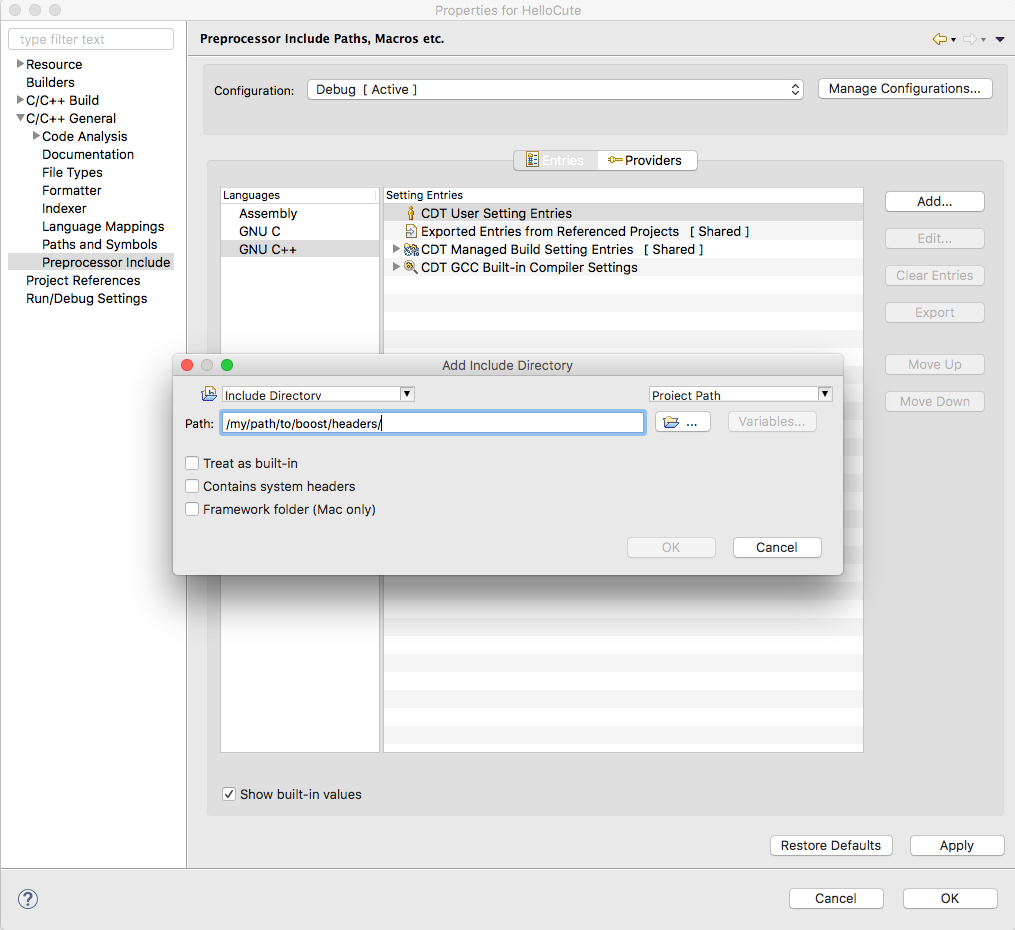
If you did not install Boost in the standard location or use CUTE’s boost-headers, you will need to specify boost’s headers installation location.
All of the wizards create a trivial test in file src/Test.cpp that will get you started. Expand this Test.cpp to create your unit test.
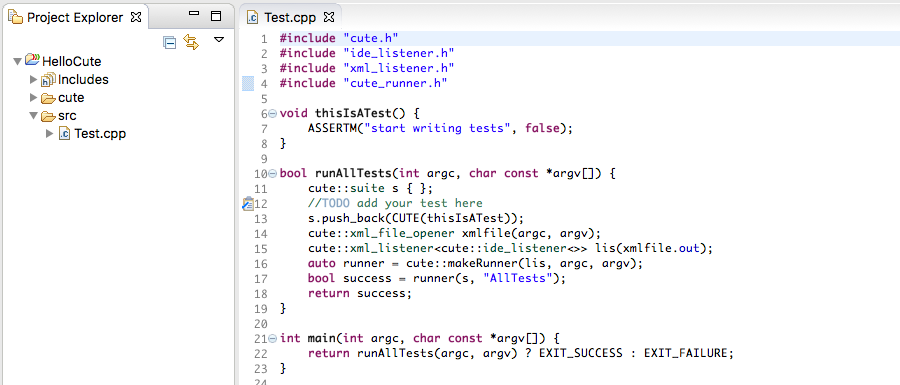
To build the project, select the menu Project > Build All. Then, right click on the HelloCute project and select Run As > CUTE Test.

Modify Test.cpp as shown below to make your unit test succeed.
#include "cute.h"
#include "ide_listener.h"
#include "xml_listener.h"
#include "cute_runner.h"

void thisIsATest() {
	std::string first, second, expected;
	first = "Hello";
	second = "World";
	expected = "Hello World";
	ASSERT_EQUAL(expected, first + " " + second);
}

bool runAllTests(int argc, char const *argv[]) {
	cute::suite s { };
	//TODO add your test here
	s.push_back(CUTE(thisIsATest));
	cute::xml_file_opener xmlfile(argc, argv);
	cute::xml_listener<cute::ide_listener<>> lis(xmlfile.out);
	auto runner = cute::makeRunner(lis, argc, argv);
	bool success = runner(s, "AllTests");
	return success;
}

int main(int argc, char const *argv[]) {
    return runAllTests(argc, argv) ? EXIT_SUCCESS : EXIT_FAILURE;
}With Test.cpp modified as follows…
#include "cute.h"
#include "ide_listener.h"
#include "xml_listener.h"
#include "cute_runner.h"

void thisIsATest() {
	std::string first, second, expected;
	first = "Hello";
	second = "World";
	expected = "Hello World";
	ASSERT_EQUAL(expected, first + "    \t  \n" + second);
}

bool runAllTests(int argc, char const *argv[]) {
	cute::suite s { };
	//TODO add your test here
	s.push_back(CUTE(thisIsATest));
	cute::xml_file_opener xmlfile(argc, argv);
	cute::xml_listener<cute::ide_listener<>> lis(xmlfile.out);
	auto runner = cute::makeRunner(lis, argc, argv);
	bool success = runner(s, "AllTests");
	return success;
}

int main(int argc, char const *argv[]) {
    return runAllTests(argc, argv) ? EXIT_SUCCESS : EXIT_FAILURE;
}
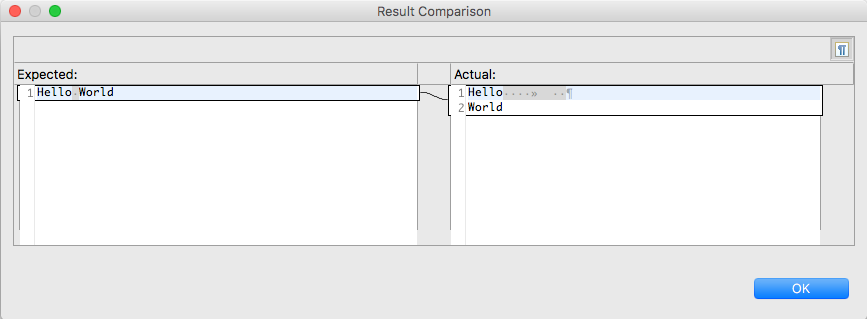
…double clicking at the location of the blue arrow (as shown above) pops up the result comparison.
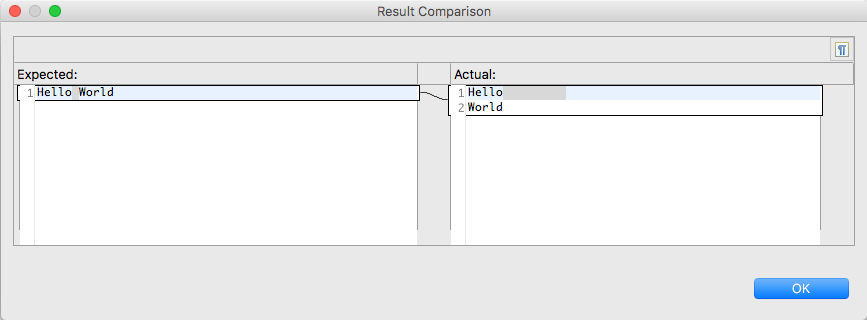
Spaces, tabs and newlines can be turned on.
The following assertion macros are available in the CUTE testing framework.
ASSERTM(msg, cond)
ASSERT(cond)
ASSERT_EQUALM(msg, expected, actual)
ASSERT_EQUAL(expected, actual)
ASSERT_EQUAL_DELTAM(msg, expected, actual, delta)
ASSERT_EQUAL_DELTA(expected, actual, delta)
ASSERT_EQUAL_RANGES(expbeg, expend, actbeg, actend)
ASSERT_EQUAL_RANGESM(msg, expbeg, expend, actbeg, actend)
ASSERT_GREATERM(msg, left, right)
ASSERT_GREATER(left, right)
ASSERT_GREATER_EQUALM(msg, left, right)
ASSERT_GREATER_EQUAL(left, right)
ASSERT_LESSM(msg, left, right)
ASSERT_LESS(left, right)
ASSERT_LESS_EQUAL(left, right)
ASSERT_LESS_EQUALM(msg, left, right)
ASSERT_THROWS(code, exc)
ASSERT_THROWSM(msg, code, exc)
FAIL()
FAILM(msg)
ASSERT*_DDT(cond, failure)
ASSERT*_DDTM(msg, cond, failure)
ASSERT_NOT_EQUAL_TO(left, right)
ASSERT_NOT_EQUAL_TOM(msg, left, right)
See Writing and Running CUTE Unit Test Suites for details.
From within the CUTE Tests view you can select tests or suites from the tree and let these run individually. If the view was populated from a “Debug as CUTE Test” the re-run will be within the debugger as well.
The CUTE framework can generate XML output. While this doesn’t directly link with the CUTE framework, you can click on the generated XML file in the project’s root folder from within CDT and might get Eclipse’s JUnit View if you have installed JDT as well. The XML output might be interesting for you when using hudson or jenkins.
Right click on the newly created CUTE project and select Properties. Under C/C++ General->Preprocessor Include Paths, Macros etc., choose CDT User Setting Entries. Click Add… and specify the installation location of the boost headers.
The CUTE plug-in supports the user in creating and running unit tests for C++. Additionally, it provides decent support for Test Driven Development. When following Test Driven Development, the unit tests are written before the implementation. While writing the test cases, much semantic and syntactic information about the tested entities is specified. The CUTE plug-in coding assist supports the developer by generating the stubs as a framework for implementing the functionality.
Let us have a look at the TDD feature. We will introduce its functionality with a step-by-step example. Our objective is to develop a simple calculator.
Create a CUTE Project in CDT.

Note: After creating the project there might be several markers indicating problems in Test.cpp. They will vanish as soon as CDT has finished indexing the symbols of that file.
First we want to create a Calculator class. We will stick with the mental model of a pocket calculator, always displaying the current value. A member function named value shall return it. The initial value in the calculator is 0. This composes our first unit test:
void testInitialValue() {
    Calculator calc {};
    ASSERT_EQUAL(0, calc.value());
}
As there is already an example test case after creating a new CUTE Project, we can recycle this test by renaming it (Alt+Shift+R when the caret is at the test function name). Then we replace the code in the body with our test code.
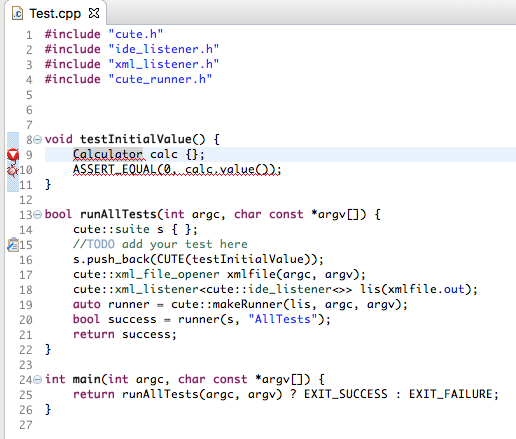
An error marker appears at the line containing Calculator. Hovering the mouse cursor over the marker on the left or over the identifier Calculator reveals the problem: Type ‘Calculator’ cannot be resolved, indicating that at the current position the type Calculator is not known.

By clicking this marker or by pressing Ctrl+1, a so called resolution appears:

Selecting this resolution creates an empty type definition for Calculator. The kind of type can directly be specified from a list containing struct (which is default), class and enum.
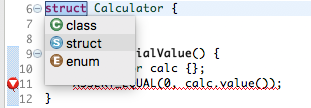
The following code is generated:
struct Calculator {
};

void testInitialValue() {
	Calculator calc {};
	ASSERT_EQUAL(0, calc.value());
}
Generating this empty type stub removed the marker at Calculator. But another marker appeared at the statement calc.value() as the type Calculator does not contain a member function value.
Again, by clicking the marker and selecting the resolution Create member function value, a stub for the corresponding function is generated in the type Calculator.
struct Calculator {
	int value() const {
		return int();
	}
};
Compiling and running the test works now. It even yields a green bar.
We do not want to have the tested code in the same source files as the test code. Thus we move our implementation of Calculator to its own file.
To achieve this, you have to select the type definition and invoke the Extract to new header file refactoring (Alt+Shift+P).
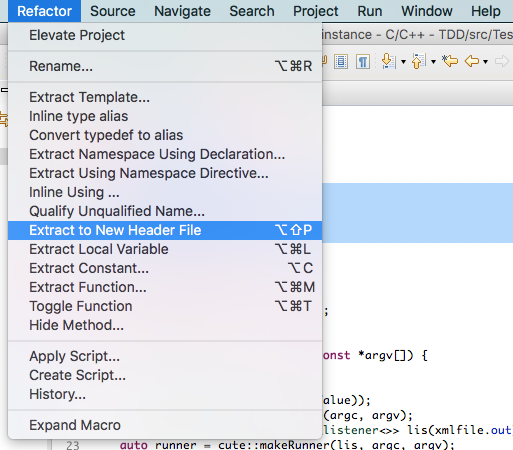
This extracts the type definition Calculator to its own header file.
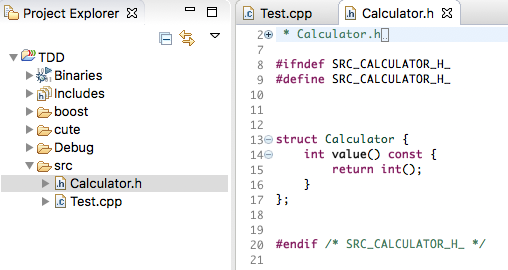
An include directive is added to Test.cpp to retain accessibility of Calculator in the test.
In the new header file we can toggle the definition of @value@ out of the type. Use Toggle Function Definition (Alt+Shift+T) to separate the definition from the declaration of the selected member function.
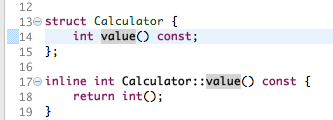
If desired, the Toggle Function refactoring can be invoked again, which moves the definition of value to the source file Calculator.cpp. If that file does not exist, it is created.
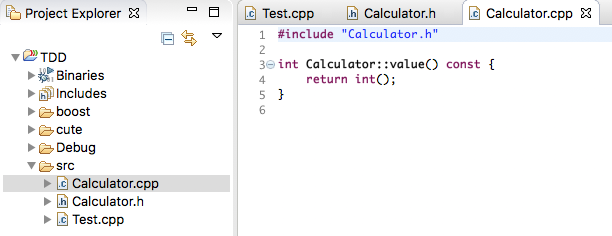
To have a proper separation of test and implementation projects, you need to move the files specifying the Calculator type to their own project. Currently, this is not supported by a refactoring we know. Thus we will skip this and stick with one single project.
Now we extend our @Calculator@ type to be constructible with a specific value. To do so we create another test case in @Test.cpp@:
void testSpecifiedStartValue(){
    int startValue { 23 };
    Calculator calc(startValue);
    ASSERT_EQUAL(startValue, calc.value());
}
After writing the code above we encounter a further error marker at the declaration of calc.

Cleary this constructor is missing, as we have no constructor defined for Calculator. The resolution for the problem accomplishes this for us.

If we open the Calculator.h file, we see a new constructor defined in Calculator.
struct Calculator {
    Calculator(int& startValue) {
    }

    int value() const;
};The new constructor does not do much. We can add a member variable to the initializer list to store the starting value. Of course we do not need to declare it manually. We just add the initialization and receive another marker:

The following resolution creates the declaration of the member variable in the private section:

This is the result:
struct Calculator {
    Calculator(int& startValue) : val { startValue } {
    }

    int value() const;

private:
    int val;
};
If we now change value() to return the val member variable we almost have two green-bar unit tests.
In Test.cpp we see another error marker in the first test function. Through the declaration of the new explicit constructor we have removed the implicit default constructor. Our plug-in recognizes that and suggests to create another constructor:

With this resolution we can add a default constructor with one click. We just need to add the initialization of val by hand.
There is also a warning marker indicating that we have not yet added this new test case to our test suite in Test.cpp at testSpecifiedStartValue. The plug-in can handle this too:

The resolution adds the test function testSpecifiedStartValue to our test suite s:
bool runAllTests(int argc, char const *argv[]) {
	cute::suite s { };
	s.push_back(CUTE(testInitialValue));
	s.push_back(CUTE(testSpecifiedStartValue));
	cute::xml_file_opener xmlfile(argc, argv);
	cute::xml_listener<cute::ide_listener<>> lis(xmlfile.out);
	auto runner = cute::makeRunner(lis, argc, argv);
	bool success = runner(s, "AllTests");
	return success;
}
Now compiling and running our unit tests results in a green bar for both tests.
The steps described are examples of the capabilities of our plug-in’s TDD features. It can also recognize for example missing operators, local variables and free functions.
As it is very complex to provide sensible code stubs for C++ just from the context where an entity is used, it takes quite some effort to achieve flawless code generation. Therefore, feedback is greatly appreciated.
Information about symbols, which is required for reporting errors and providing resolutions, heavily depends on the CDT index to be built completely.
Here you will learn how to create and run tests for your code using the CUTE C++ unit testing framework. We begin with the initial trivial test src/Test.cpp that is created by the Using the CUTE Eclipse Plug-in.
Before you start writing tests, you need a plan for organizing your source files.
If your test is short enough to fit into one file, then you can simply add it to the trivial source file src/Test.cpp provided by CUTE:
#include "cute.h"
#include "ide_listener.h"
#include "xml_listener.h"
#include "cute_runner.h"

// TODO #include the headers for the code you want to test

// TODO Add your test functions

void thisIsATest() {
    ASSERTM("start writing tests", false);
}

bool runAllTests(int argc, char const *argv[]) {
    cute::suite s { };

    //TODO add your test here

    s.push_back(CUTE(thisIsATest));
    cute::xml_file_opener xmlfile(argc, argv);
    cute::xml_listener<cute::ide_listener<>> lis(xmlfile.out);
    auto runner = cute::makeRunner(lis, argc, argv);
    bool success = runner(s, "AllTests");
    return success;
}

int main(int argc, char const *argv[]) {
    return runAllTests(argc, argv) ? EXIT_SUCCESS : EXIT_FAILURE;
}
Edit this file:
#include the header files for the classes you are testing.thisIsATest() with your test functions.thisIsATest in s.push_back(CUTE(thisIsATest)) with your test functions.Chances are, you will want to partition your tests into multiple files. Generally, it is best to have one test suite for each source file in the project that you are unit testing. The test suite consists of a header (.h) file and an implementation (.cpp) file. Name them consistently. For example, put class myclass in files myclass.cpp and myclass.h, and put the unit test for myclass in myclassTest.cpp and myclassTest.h.
The test consists of a series of lines that set up some situation to be checked, followed by a CUTE assertion to perform the check.
In your test implementation file (myclassTest.cpp in the above example), include the file that defines the CUTE assertions:
#include "cute.h"The header cute.h provides a variety of macros you can use to verify conditions. Most assertions have two versions: one version uses the source code of the test itself as the message, and the other allows you to specify your own message msg.
ASSERTM(msg, cond)ASSERT(cond)
If cond is false, the test fails.
FAILM(msg)FAIL()
Fail unconditionally. The message “@FAIL()@” is used if no message is specified.
ASSERT_EQUALM(msg, expected, actual)ASSERT_EQUAL(expected, actual)
If expected and actual are not equal, fail and print the values of expected and actual. Specify an unsigned constant when comparing to unsigned value. For example,
ASSERT_EQUAL(5u, vect.size());Take care to specify the expected value followed by the actual value, as shown above. If you reverse them, they appear backwards in the failure message.
ASSERT_NOT_EQUAL_TOM(msg, left, right)ASSERT_NOT_EQUAL_TO(left, right)
Fail if left and right are equals.
ASSERT_EQUAL_DELTAM(msg, expected, actual, delta)ASSERT_EQUAL_DELTA(expected, actual, delta)
Fail if expected and actual are different by more than delta. Use this assertion for real numbers.
ASSERT_EQUAL_RANGESM(msg, expbeg, expend, actbeg, actend)ASSERT_EQUAL_RANGES(expbeg, expend, actbeg, actend)
Fail if the ranges defined by expbeg and expend, and actbeg and actend are different.
ASSERT_THROWSM(msg, code, exception)ASSERT_THROWS(code, exception)
Fail if code does not throw exception of type exception.
void test_that_something_throws() {
    ASSERT_THROWS(should_throw_std_exception(),std::exception);
}
ASSERT_GREATERM(msg, left, right)ASSERT_GREATER(left, right);ASSERT_GREATER_EQUALM(msg, left, right)ASSERT_GREATER_EQUAL(left, right);ASSERT_LESSM(msg, left, right)ASSERT_LESS(left, right);ASSERT_LESS_EQUALM(msg, left, right)ASSERT_LESS_EQUAL(left, right);
Fail if left is greater/greater equals/lesser/lesser equals than right.
ASSERT*_DDTM(msg, cond, failure)ASSERT*_DDT(cond, failure)
All the above macros are available with DDT in the macro name. Use these macros to do data driven testing.
Put these assertions in the test implementation file (myclassTest.cpp in the above example).
A CUTE test suite is a vector of tests. The tests are executed in the order in which they were appended to the suite. If an assertion in some test fails, the failure is reported, and the rest of the test is skipped. Execution continues with the next test in the suite. This means that a suite of many short tests is better than a few long tests:
In the trivial source file provided with CUTE src/Test.cpp, include the test header file for your test. For example,
#include "myclassTest.h"If you prefer to write your tests as simple functions, implement the test function, and push it on the test suite using the CUTE() macro:
s.push_back(CUTE(mytestfunction));If you prefer to implement your test as a class or struct, define a functor class in a header file, say myclassTest.h:
// File myclassTest.h

class myclassTest {
public:
    myclassTest();
    // Must define void operator() with no arguments.
    // In implementation: add calls to cute-assert functions and methods like someFunction1
    void operator()();

private:
    // Whatever methods you need
    void someFunction1();
    void someFunction2();

    // Whatever member variables you need
    int memberVar1;
    int memberVar2;
};
Put the implementation of @mytestClass@ in a separate file, like myclassTest.cpp.
Returning to the test suite code (src/Test.cpp), include the test class header file and add the test functor to the test suite:
#include "cute.h"
#include "ide_listener.h"
#include "xml_listener.h"
#include "cute_runner.h"

// TODO #include the headers for the code you want to test
#include "myclassTest.h"
#include "anotherclassTest.h"

bool runAllTests(int argc, char const *argv[]) {
    cute::suite s { };

    //TODO add your test here
    s.push_back(myclassTest{ });
    s.push_back(anotherclassTest{ });

    cute::xml_file_opener xmlfile(argc, argv);
    cute::xml_listener<cute::ide_listener<>> lis(xmlfile.out);
    auto runner = cute::makeRunner(lis, argc, argv);
    bool success = runner(s, "AllTests");
    return success;
}

int main(int argc, char const *argv[]) {
    return runAllTests(argc, argv) ? EXIT_SUCCESS : EXIT_FAILURE;
}Compile and execute the test. The tests will be executed in the order in which they were appended to the suite. If an assertion fails, it is reported through the listener, and the test containing the failed assertion is aborted. Execution continues with the next test in the suite.
Of course you can just add new test functions by hand and and also add them to the test suite that way. CUTE also offers code generators to make these tasks faster and easier.
To add a new test function, place your cursor at the location where the new function should be inserted:
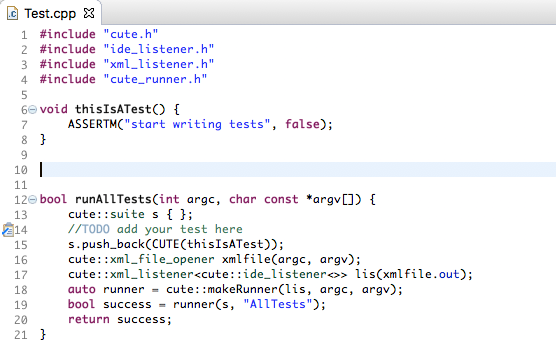
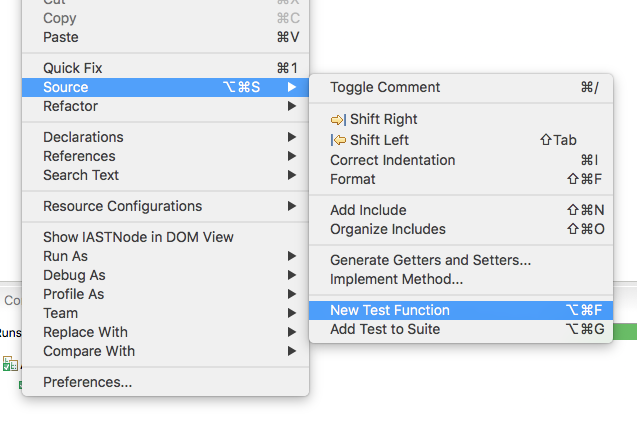
Right-click and select Source > New Test Function.
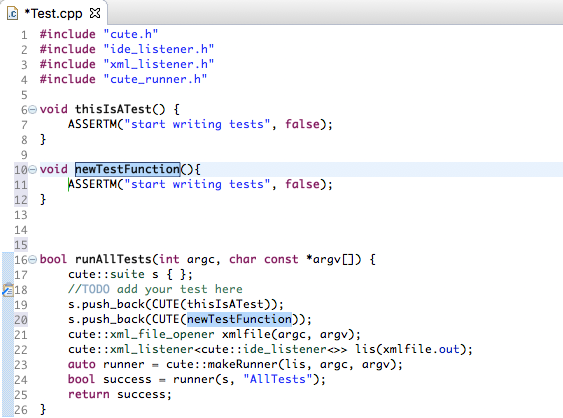
At this point, you can give the new test function a unique name. Note that the test function has automatically been registered in the test suite.
If you write a new test function by hand, you can automatically add it to the test suite as described in the following.
Your test function (a function is only considered a test function if it contains at least one ASSERT*-statement) will automatically be annotated by a marker and yellow underlined as shown in the following image.
Click the marker (or press Ctrl+1 when the caret is on the given line) and choose “Add test to suite”.

A functor here is defined as: any class or struct with a public operator() that takes zero arguments.
Place your cursor anywhere along the desired function. Right click Source > Add Test > Add Test functor to Suite.
#include "cute.h"
#include "ide_listener.h"
#include "xml_listener.h"
#include "cute_runner.h"

struct StructTest {
    void operator() () {
        ASSERTM("Failing test", false);
    }
};

struct WithConstructor {
	WithConstructor(int x) : x{ x } {

    }
    int x;
    void operator() () {
        ASSERT_EQUALM("x should be 5", 5, x);
    }
};

bool runAllTests(int argc, char const *argv[]) {
	cute::suite s { };
	s.push_back(StructTest());
	s.push_back(WithConstructor(4));
	s.push_back(WithConstructor(5));
	cute::xml_file_opener xmlfile(argc, argv);
	cute::xml_listener<cute::ide_listener<>> lis(xmlfile.out);
	auto runner = cute::makeRunner(lis, argc, argv);
	bool success = runner(s, "AllTests");
	return success;
}

int main(int argc, char const *argv[]) {
    return runAllTests(argc, argv) ? EXIT_SUCCESS : EXIT_FAILURE;
}A test method in a class or struct can be added. See the code bellow as example.
A class or struct method needs to be public, non static, parameterless, non union. The class needs to be default constructible. An instance method needs to be public, non static, parameterless, non union and its return type needs to be void.
#include "cute.h"
#include "ide_listener.h"
#include "xml_listener.h"
#include "cute_runner.h"

struct MemberTest {
    bool aTest() {
        ASSERT(false);
    }
};

struct WithConstructor {
    WithConstructor(int x) : x{ x } { }
    int x;
    void operator() () {
        ASSERT_EQUALM("x should be 5", 5, x);
    }

    void test10() {
        ASSERT_EQUALM("x should be 10", 10, x);
    }
};

bool runAllTests(int argc, char const *argv[]) {
	cute::suite s { };
	s.push_back(CUTE_SMEMFUN(MemberTest, aTest));
	s.push_back(WithConstructor(5));

	WithConstructor instance { 5 };
	s.push_back(CUTE_MEMFUN(instance, WithConstructor, operator())); //same as above
	s.push_back(CUTE_MEMFUN(instance, WithConstructor, test10));

	cute::xml_file_opener xmlfile(argc, argv);
	cute::xml_listener<cute::ide_listener<>> lis(xmlfile.out);
	auto runner = cute::makeRunner(lis, argc, argv);
	bool success = runner(s, "AllTests");
	return success;
}

int main(int argc, char const *argv[]) {
    return runAllTests(argc, argv) ? EXIT_SUCCESS : EXIT_FAILURE;
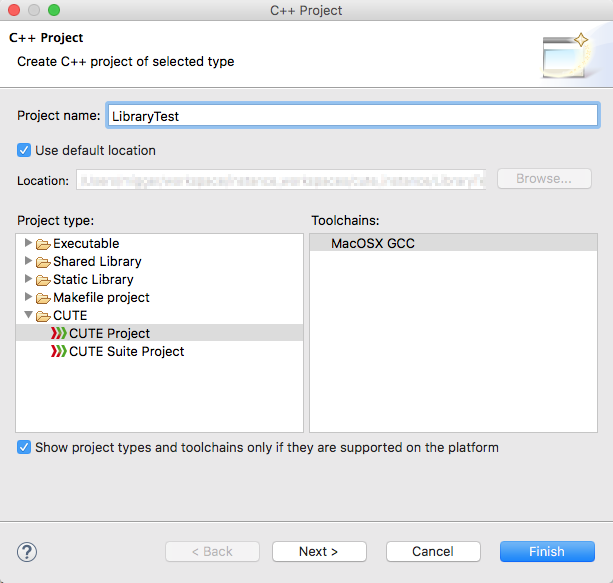
}First, create a shared or static library project. Ensure that the library project is opened, else it wouldn’t be shown in the following steps. Next create a CUTE Test Project. To do this select File->New->C++ Project, then expand CUTE and select CUTE Project. Give your project a name and press _Next >.
Check the checkbox Add Library Dependency. Then select the desired library project you would like to test.
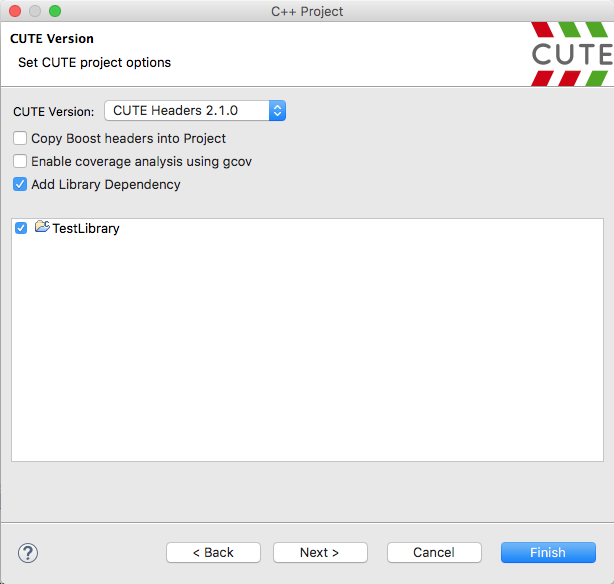
Press Next > or Finish to complete the wizard.
Under Project > Properties > C/C++ Build > Settings, one of the following compiler -I and Linker -l -L settings will be set. Subsequent changes can be managed by the user.
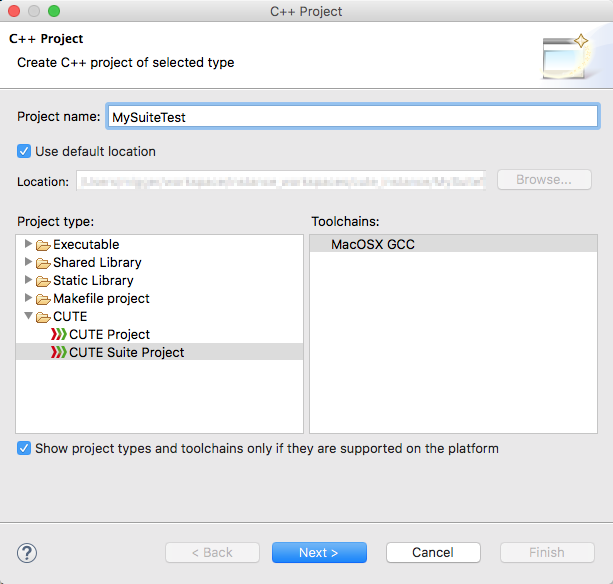
A CUTE project with a custom test suite name can be created easily with the CUTE Suite Project wizard. To do this, select File > New > C++ Project. Then, expand CUTE, select CUTE Suite Project and give your project a name.
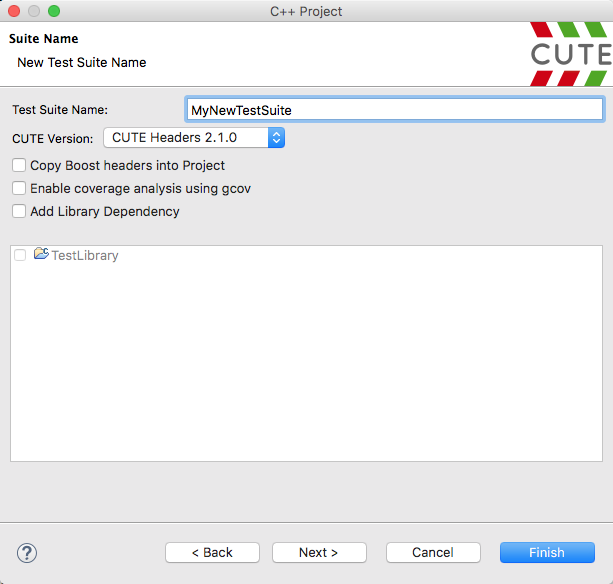
Click Next > and specify a suite name.
A project with the structure shown below will be created.
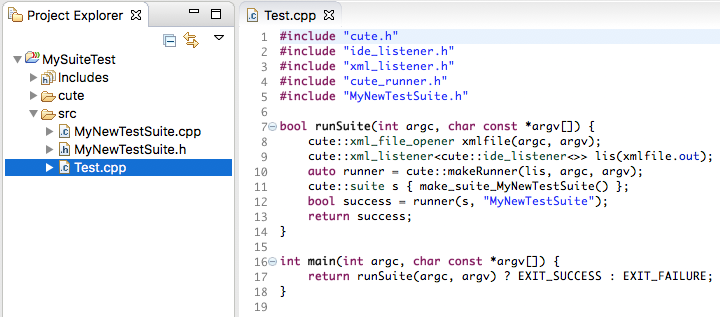
Add tests that belong to the newly created suite in <your_suite_name>.cpp.
Right-click on a project, folder or file (.cpp or .h) and choose New > CUTE Suite File.
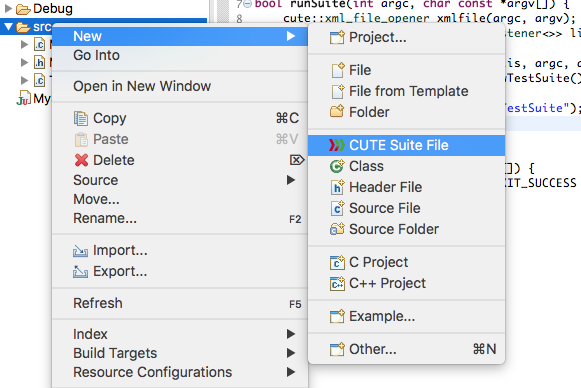
Enter the name of your new suite and click Finish.
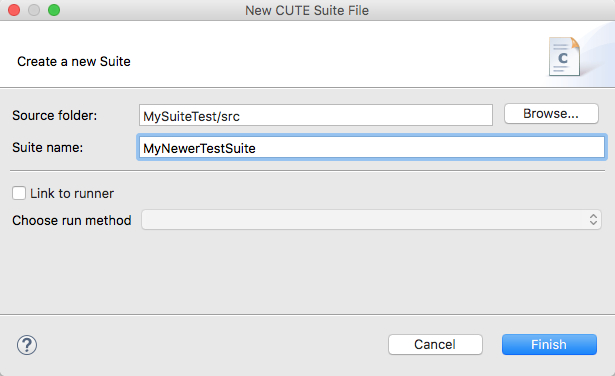
Now you need to have your runner also integrate the cute::suite that is returned by the make_suite_<your_suite_name>() function in <your_suite_name>.h.
The initial Test.cpp (or the file that contains your cute::makeRunner(...) call) should look similar to this:
#include "cute.h"
#include "ide_listener.h"
#include "xml_listener.h"
#include "cute_runner.h"
#include "MyNewTestSuite.h"

bool runSuite(int argc, char const *argv[]) {
    cute::xml_file_opener xmlfile(argc, argv);
    cute::xml_listener<cute::ide_listener<>> lis(xmlfile.out);

    auto runner = cute::makeRunner(lis, argc, argv);
    cute::suite s { make_suite_MyNewTestSuite() };

    bool success = runner(s, "MyNewTestSuite");
    return success;
}

int main(int argc, char const *argv[]) {
    return runSuite(argc, argv) ? EXIT_SUCCESS : EXIT_FAILURE;
}
Add an include to <your_suite_name>.h and instantiate a new cute::suite using make_suite_<your_suite_name>() as argument. Then add a runner call.
#include "cute.h"
#include "ide_listener.h"
#include "xml_listener.h"
#include "cute_runner.h"
#include "MyNewTestSuite.h"
#include "MyNewerTestSuite.h" //new line

bool runSuite(int argc, char const *argv[]) {
	cute::xml_file_opener xmlfile(argc, argv);
	cute::xml_listener<cute::ide_listener<>> lis(xmlfile.out);

	auto runner = cute::makeRunner(lis, argc, argv);
	cute::suite s { make_suite_MyNewTestSuite() };
	cute::suite MyNewerTestSuite { make_suite_MyNewerTestSuite() }; //new line

	bool success = runner(s, "MyNewTestSuite");
	success = runner(MyNewerTestSuite, "MyNewerTestSuite") && success; //new line
	return success;
}

int main(int argc, char const *argv[]) {
    return runSuite(argc, argv) ? EXIT_SUCCESS : EXIT_FAILURE;
}
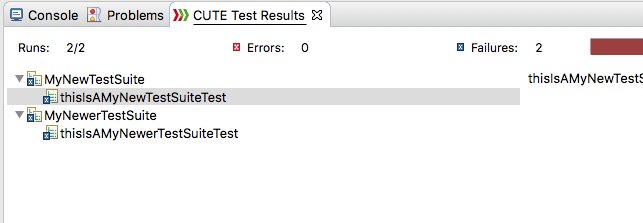
After this, the CUTE test view should look as shown below:
